实现机制
在每一View的layer层中有一个mask属性,他就是专门来设置该View的遮罩效果的。该mask本身也是一个layer层。我们只需要生成一个自定义的layer,然后覆盖在需要遮罩的View上面即可。问题就归于如何生成入上图所示的不规则图片的Layer。CAShapeLayer可以根据几个点的依次连线,产生一个闭合空间的layer。
实现方法
实现一个CAShapeLayer的Category。
+ (instancetype)createMaskLayerWithView : (UIView *)view{

       CGFloat viewWidth = CGRectGetWidth(view.frame);
       CGFloat viewHeight = CGRectGetHeight(view.frame);

       CGFloat rightSpace = 10;
       CGFloat topSpace = 10;
       CGFloat radius = 10;

       CGPoint point1 = CGPointMake(0, radius);
       CGPoint point2 = CGPointMake(radius, 0);
       CGPoint point3 = CGPointMake(viewWidth-rightSpace-radius, 0);
       CGPoint point4 = CGPointMake(viewWidth-rightSpace, topSpace);
       CGPoint point5 = CGPointMake(viewWidth, topSpace);
       CGPoint point6 = CGPointMake(viewWidth-rightSpace, topSpace+10);
       CGPoint point7 = CGPointMake(viewWidth-rightSpace, viewHeight-radius);
       CGPoint point8 = CGPointMake(viewWidth-rightSpace-radius, viewHeight);
       CGPoint point9 = CGPointMake(radius, viewHeight);
       CGPoint point10 = CGPointMake(0, viewHeight-radius);

       UIBezierPath *path = [UIBezierPath bezierPath];
       [path moveToPoint:point1];
       [path addArcWithCenter:CGPointMake(radius, radius) radius:radius startAngle:M_PI endAngle:M_PI*1.5 clockwise:YES];
       [path addLineToPoint:point2];
       [path addLineToPoint:point3];
       [path addArcWithCenter:CGPointMake(viewWidth-2*radius, radius) radius:radius startAngle:M_PI*1.5 endAngle:0 clockwise:YES];
       [path addLineToPoint:point4];
       [path addLineToPoint:point5];
       [path addLineToPoint:point6];
       [path addLineToPoint:point7];
       [path addArcWithCenter:CGPointMake(viewWidth-2*radius, viewHeight-radius) radius:radius startAngle:0 endAngle:M_PI*0.5 clockwise:YES];
       [path addLineToPoint:point8];
       [path addLineToPoint:point9];
       [path addArcWithCenter:CGPointMake(radius, viewHeight-radius) radius:radius startAngle:M_PI*0.5 endAngle:M_PI clockwise:YES];
       [path addLineToPoint:point10];
       [path closePath];

       CAShapeLayer *layer = [CAShapeLayer layer];
       layer.path = path.CGPath;

       return layer;
}

       UIView *view = [[UIView alloc] initWithFrame:CGRectMake(40, 50, 200, 40)];
       view.backgroundColor = [UIColor orangeColor];
       CAShapeLayer *layer = [CAShapeLayer createMaskLayerWithView:view];
       view.layer.mask = layer;
       [self.view addSubview:view];
参数说明
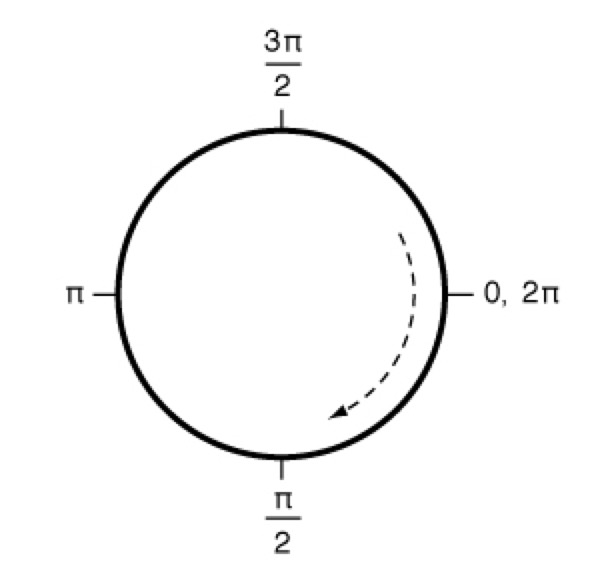
center:Specifies the center point of the circle (in the current coordinate system) used to define the arc.
radius:Specifies the radius of the circle used to define the arc.
startAngle: Specifies the starting angle of the arc (measured in radians).
endAngle:Specifies the end angle of the arc (measured in raians).
clockwise:The direction in which to draw the arc.
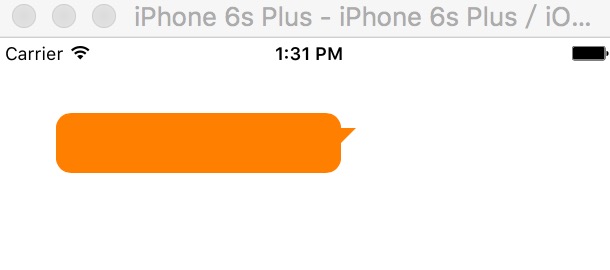
实现效果如下图: